Quantcast
Channel: CodeProject Archives | phpGrid - PHP Datagrid
Viewing all 15 articles
Browse latest View live

phpGrid, Twitter Bootstrap Integration

$
0
0
phpgrid twitter bootstrap integrationRun Demo


This is a step-by-step tutorial of how to integrate SmartAdmin, or any other Bootstrap them, with phpGrid.

SmartAdmin is a popular Bootstrap admin theme. It has modern flat design and responsive layout. SmartAdmin comes with 5 different versions: Pure HTML, AJAX Version, PHP version, Modular AngularJS, and ASP.NET MVC5 versions. For this example, we use PHP version, and specifically, the PHP Ajax version.


What you will need

  1. Acquire a copy of phpGrid. You can use either the free, phpGrid Lite or get phpGrid full version here.
  2. Get Bootstrap SmartAdmin. Many Bootstrap themes are also available for free on the Internet.

Now that you’ve downloaded both, let’s get started.


1. Folder Structure

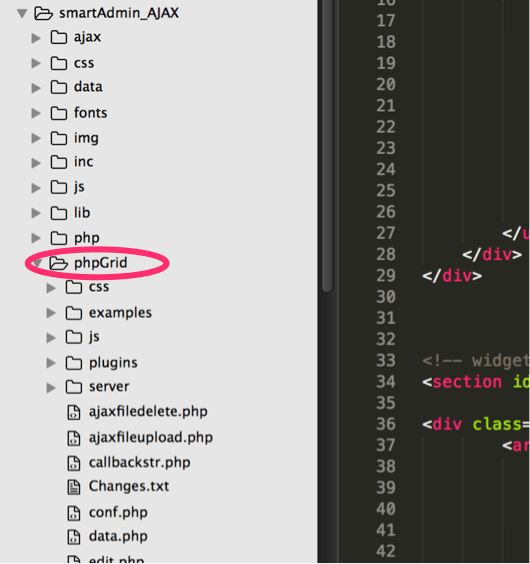
As mentioned earlier, we will use SmartAdmin’s PHP version. InsidePHP_version folder, you will find two subfolders, PHP_Ajax_version andPHP_HTML_version. Here, only PHP_Ajax_version folder is copied to web root directory and renamed as smartAdmin_AJAX (see below).

Secondly, save our phpGrid folder in smartAdmin_AJAX as shown. However, you can save it to any folder.


phpgrid bootstrap folder structure


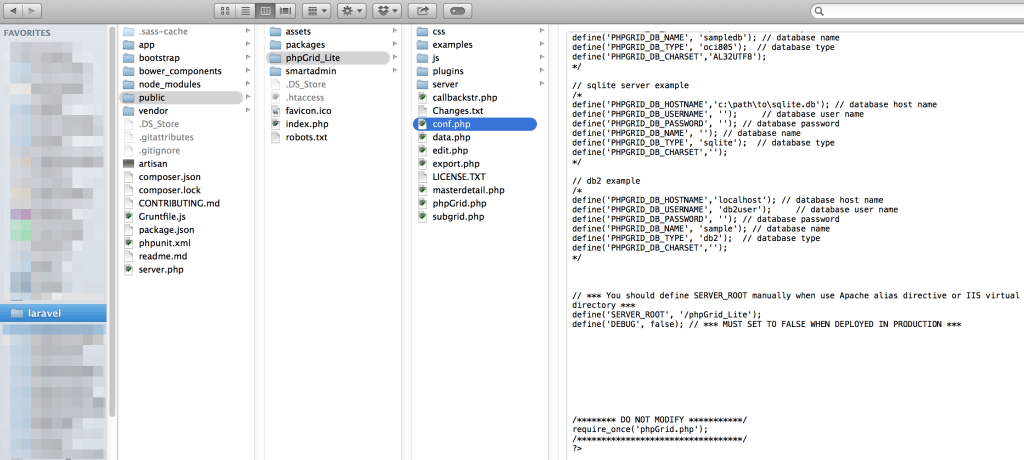
2. Update phpGrid conf.php

Before you begin coding using phpGrid, you must specify database information in conf.php, phpGrid configuration file in which we specify the following values:

  1. Database connection information,
  2. SEVER_ROOT,
  3. THEME

It’s important that we set THEME value as “NONE”. The reason is that we don’t need to provide a jQuery UI theme as Bootstrap already includes a theme. Using two jQuery themes will likely result in CSS conflicts and style inconsistency.

To learn more about phpGrid configuration, read the installation guide:http://phpgrid.com/documentation/installation/

For the purposes of this demo, we will use a MySQL database. In the figure below, you can see an example of the necessary database definitions as they appear in conf.php.

1
2
3
4
5
6
7
8
9
10
11
12
13
14
15
<?php
define('PHPGRID_DB_HOSTNAME', 'localhost:3306');
define('PHPGRID_DB_USERNAME', 'root');    
define('PHPGRID_DB_PASSWORD', '');
define('PHPGRID_DB_NAME', 'sampledb');
define('PHPGRID_DB_TYPE', 'mysql');  
define('PHPGRID_DB_CHARSET','utf8');
define('SERVER_ROOT', '/smartAdmin_AJAX/phpGrid');
define('THEME', 'NONE');
// *** MUST SET TO FALSE WHEN DEPLOYED IN PRODUCTION ***
define('DEBUG', false);
/******** DO NOT MODIFY ***********/
require_once('phpGrid.php');    
/**********************************/
?>

3. Edit Bootstrap lib/config.php

phpGrid requires PHP SESSION. To ensure that the PHP session starts properly, open the file config.php on the SmartAdmin_AJAX/lib/ directory and copy and paste the following text at the very top of the file.

1
if (session_id() == ''){ session_start();}

phpgrid bootstrap session


The setup process is now complete.
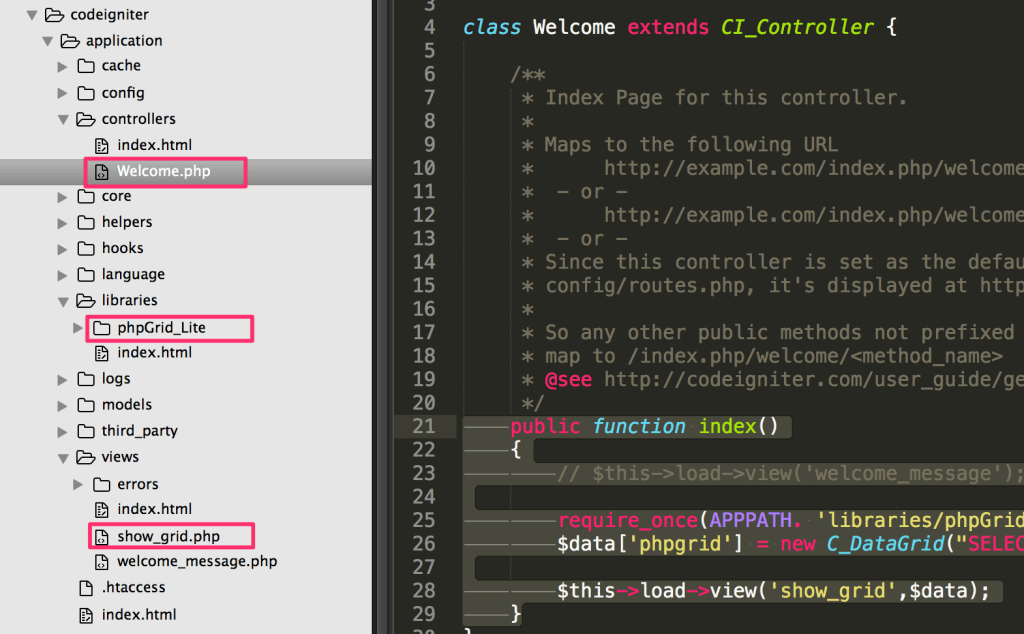

4. Insert PHP Grid

In this demo, we will add a reference call to phpGrid directly in SmartAdminajax/dashboard.php. . This call can be in any file in SmartAdmin ajax folder.
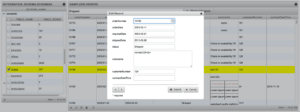
1
2
3
4
5
6
7
8
9
10
<?php
 require_once(../phpGrid/conf.php”);
 $dg = new C_DataGrid(“SELECT * FROM orders”, “orderNumber”, “orders”);
 $dg->enable_search(true);
 $dg->enable_export(‘EXCEL’);
 $dg->enable_edit(‘INLINE’);
 $dg->set_col_hidden(‘comments’);
 $dg->set_col_edittype(“status”, “select”, “Shipped:Shipped;Canceled:Cancelled;Open:Open;Pending:Pending”); $dg->enable_autowidth(true);
 $dg->display();
 ?>

Note the first line that references phpGrid/conf.php.

“orders” is a database table name from our MySQL sample database. You can find the sample MySQL sample database inside phpGrid/examples/SampleDBfolder.

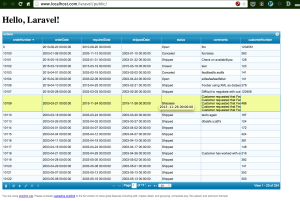
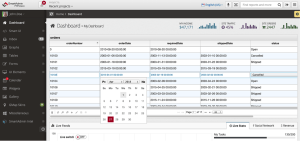
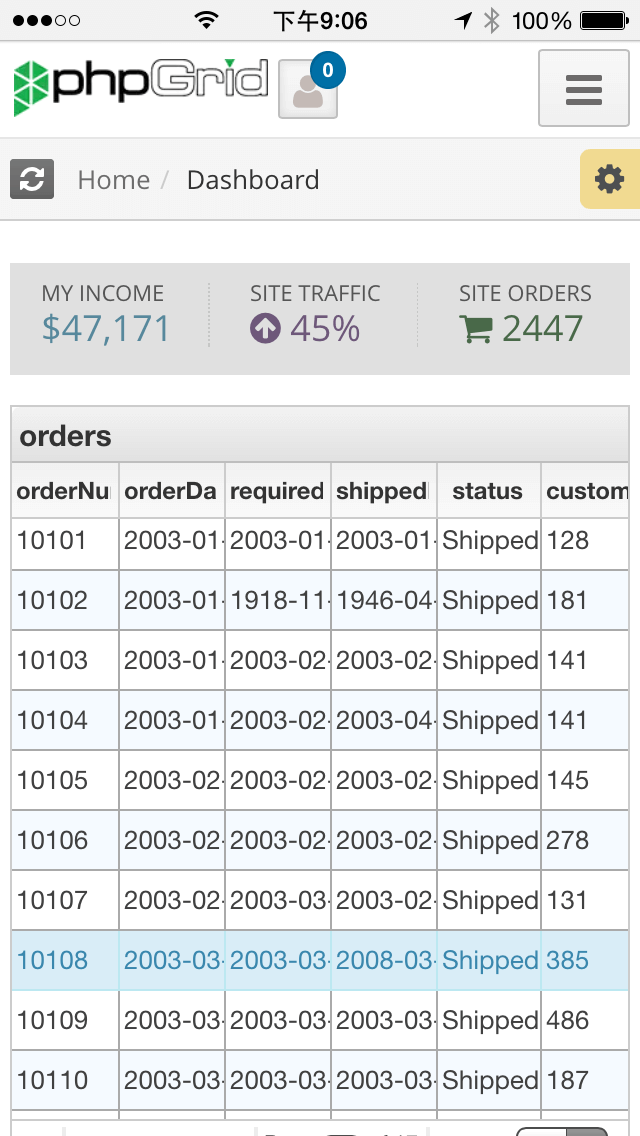
Now visit the following URL to play around with your newly created PHP grid by using functions such as CRUD, search, and export! You can find a complete list of phpGrid demo here.

1
http://<YOUR WEB SERVER>/smartAdmin_AJAX/


5. Add Custom CSS (Optional)

At this point, the installation is complete. However, I refined jqGrid CSS so the final result would be more aesthetically pleasing. Here’s the final version of the CSS. Feel free to use this code on your page.

1
2
3
4
5
6
7
8
9
10
11
12
13
14
15
16
17
18
19
20
21
22
23
24
25
26
27
<style>
 /* phpGrid to re-expand 100%. Needed when page is loaded in Ajax and there’s sidebar */
 div.ui-jqgrid.ui-widget.ui-widget-content.ui-corner-all{
 width: 100% !important;
 overflow: auto;
 }
/* prevent Bootstrap CSS conflict by reseting phpGrid header CSS */
 .ui-jqgrid .ui-jqgrid-htable th div {
 position: inherit;
 height: initial;
 }
.ui-jqgrid .ui-jqgrid-view input, .ui-jqgrid .ui-jqgrid-view select, .ui-jqgrid .ui-jqgrid-view textarea, .ui-jqgrid .ui-jqgrid-view button {
 width: 100%;
 height: 100%;
 padding:0px;
 }
/* FORM edit */
 .ui-jqdialog-content table.EditTable input{
 width: 90%;
 }
 .ui-jqdialog-content table.EditTable select{
 width: 95%;
 }
 .ui-jqdialog-content table.EditTable textarea{
 width:90%;
 }
 </style>

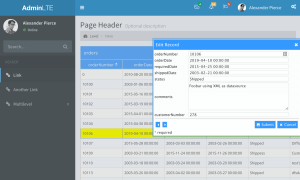
That’s it. You now have a fully functional and great-looking, responsive PHP grid in your Bootstrap. And it also works great on mobile devices!


phpGrid Bootstrap is mobile friendly.


The post phpGrid, Twitter Bootstrap Integration appeared first on phpGrid.


phpGrid Laravel Integration

$
0
0
phpgrid-laravel-demo

This is a step-by-step tutorial of how to integrate Laravel PHP framework with phpGrid.

Laravel is a free, open-source PHP web application framework, architected in model–view–controller (MVC) pattern. phpGrid is a standalone CRUD component encapsulating all necessary server and client side scripts and does not require Laravel packaging system for managing dependency.

System Requirements:

  • Laravel 4
  • PHP >= 5.4 (required by Laravel)
  • MCrypt PHP Extension (also required by Laravel)
  • phpGrid Lite (free)
  • Relational Database, e.g. MySQL

Laravel requires PHP version 5.4+ and MCrypt PHP Extension. Check your phpinfo to verify PHP version and MCrypt. In tutorial, we will be using free phpGrid Lite version.

php mcrypt


Set up Laravel:

The easiest way is to install Laravel is to use Composer.  However, installation procedure is outside the scope of this tutorial. Please visit http://laravel.com/docs/ for Laravel installation process. For the demo, we install Laravel folder in web server root directory.


phpGrid Folder Location in Laravel:

It’s common to save third-party libraries to Laravel “app/libraries”. However, the correct place to put phpGrid is actually in Laravel “public” folder. This is because phpGrid is more than jus the eback-end PHP classes but also contains front-end user accessible stylesheets and javascript to render datagrid. Such library must reside in the application’s “public” directory because Laravel public directory is the root directory that is accessible to users when they visit your website.

phpgrid-laravel-folder

phpGrid conf.php

You would need to setup the database connection and script path information in file “conf.php”. Since phpGrid resides in “public” folder, Laravel’s front-end root directory, phpGrid SERVER_ROOT value should be “/phpGrid_Lite”. Pay attention to the beginning slash character.

Learn more about SERVER_ROOT and rest of phpGrid system variables here.

1
define('SERVER_ROOT', '/phpGrid_Lite');

Laravel views:

Finally, one must create a view file in Laravel “app/views” folder. Since phpGrid is located in Laravel “public” folder, we can reference path to conf.php with Laravel’s public_path() helper function.

1
2
3
4
5
require_once(public_path() ."/phpGrid_Lite/conf.php");

$dg = new C_DataGrid("SELECT * FROM orders", "orderNumber", "orders");
$dg->enable_edit("INLINE", "CRUD");
$dg->display();

Note that “orders” is a database table from phpGrid sample database.


Screenshot

phpgrid-laravel-demo

The post phpGrid Laravel Integration appeared first on phpGrid.

phpGrid, Laravel 5 and Bootstrap 3

$
0
0
phpgrid-laravel5-bootstrap3-full-editRun Demo


Introduction

This tutorial will begin by walking you through the integration of the Laravel 5 and Bootstrap 3 themes. Afterwards, we will show you how to add PHP datagrid. If the Laravel and Bootstrap theme are already up and running on your server, you can skip directly to “Create ‘dashboard.blade.php’ Child Template View” or “Where is phpGrid?”.

Install Laravel 5 (with Composer)

Let’s get started. Laravel 5 has the following system requirements.

  • PHP >= 5.4
  • Mcrypt PHP Extension
  • OpenSSL PHP Extension
  • Mbstring PHP Extension
  • Tokenizer PHP Extension

Please note that these Laravel 5 system requirements apply to both the web and the command line interface. There’s always the possibility your server could be running different versions of PHP in the command line than on the web server. If this is the case, modify your PHP alias to point to the same PHP executable for both.Lastly, acquire a copy of phpGrid from download page for later use.

It’s highly recommended to use Composer to install Laravel. In order to keep the code lightweight, Laravel does not come prepackaged with any third-party libraries. Instead, it relies on Composer to manage any dependencies. Learn more on how to install Composer here.

To install Laravel, in the command line, go to web root (e.g. /www), and execute the following command:

1
#composer create-project laravel/laravel --prefer-dist

To run Laravel, certain permissions must be configured; allow the web server to have write access to subfolders under the “storage” and “vendor” folders.

laravel5-folder-permission


Laravel, AdminLTE Integration


In a previous phpGrid Bootstrap integration tutorial, we used the Bootstrap SmartAdmin theme. In this tutorial,  we will use a different theme called “AdminLTE“, an excellent and free Bootstrap 3 admin theme created by @Almasaeed2010. You can preview it at https://almsaeedstudio.com/AdminLTE.

Technically, AdminLTE works even without Laravel framework. But, by integrating it with Laravel, you get the added benefit of MVC routing and views, which ultimately results in cleaner, and more importantly, scalable code. However, the downside is that one must edit each AdminLTE page to covert it to Laravel views, preferably by using Blade template.


Convert AdminLTE “starter.html” to Laravel View


At this point, we need to convert AdminLTE’s default “starter.html” to Laravel views so we can host our PHP datagrid. This will consist of splitting the file into several “include” files, which will then be called by the startup routine.

  1. First, download AdminTLE from almsaeedstudio.com and extract the file. Copy the folders “bootstrap”, “dist”, “plugins”, and file “starter.html” to Laravel “public” folder. Open “starter.html” and copy its contents to the clipboard. This will be used as our starting point to create the new Laravel view.

    laravel5-adminlte-integration

  2. 2. Create a new view named “admin.blade.php”. (Note that all Blade templates should use the “.blade.php” extension.) Paste the text we copied from “starter.html” in the previous step, then save the new view in “resources/views”. This will be the admin default layout from which the various Blade templates will be derived.convert-admin-views
  3. 3. We now need to divide the code in admin.blade.php and copy it to a series of reusable sub-views. Create a new folder called “includes” under “resource/views”. This folder will be used to store these admin sub-views.phpgrid-laravel5-bootstrap3-includes-subviews
  4. Cut out the <header> section paste it as a new view which we will call header.blade.php. Change any hyperlinks or file references to use the Laravel “asset” help function. Save the new file in the “includes” folder.
    1
    2
    3
    4
    5
    6
    7
    8
    9
    10
    11
    12
    13
    14
    15
    16
    17
    18
    19
    20
    21
    22
    23
    24
    25
    26
    27
    28
    29
    30
    31
    32
    33
    34
    35
    36
    37
    38
    39
    40
    41
    42
    43
    44
    45
    46
    47
    48
    49
    50
    51
    52
    53
    54
    55
    56
    57
    58
    59
    60
    61
    62
    63
    64
    65
    66
    67
    68
    69
    70
    71
    72
    73
    74
    75
    76
    77
    78
    79
    80
    81
    82
    83
    84
    85
    86
    87
    88
    89
    90
    91
    92
    93
    94
    95
    96
    97
    98
    99
    100
    101
    102
    103
    104
    105
    106
    107
    108
    109
    110
    111
    112
    113
    114
    115
    116
    117
    118
    119
    120
    121
    122
    123
    124
    125
    126
    127
    128
    129
    130
    131
    132
    133
    134
    135
    136
    137
    138
    139
    <!-- Main Header -->
    <header class="main-header"><!-- Logo -->
    <a class="logo" href="index2.html">
    <!-- mini logo for sidebar mini 50x50 pixels -->
    <span class="logo-mini"><b>A</b>LT</span>
    <!-- logo for regular state and mobile devices -->
    <span class="logo-lg"><b>Admin</b>LTE</span>
    </a><!-- Header Navbar --><nav class="navbar navbar-static-top"><!-- Sidebar toggle button-->
    <a class="sidebar-toggle" href="#" data-toggle="offcanvas">
    <span class="sr-only">Toggle navigation</span>
    </a>
    <!-- Navbar Right Menu -->
    <div class="navbar-custom-menu">
    <ul class="nav navbar-nav">
    <ul class="nav navbar-nav"><!-- Messages: style can be found in dropdown.less-->
        <li class="dropdown messages-menu"><!-- Menu toggle button -->
    <a class="dropdown-toggle" href="#" data-toggle="dropdown">
    <i class="fa fa-envelope-o"></i>
    <span class="label label-success">4</span>
    </a>
    <ul class="dropdown-menu">
        <li class="header">You have 4 messages</li>
        <li><!-- inner menu: contains the messages -->
    <ul class="menu">
    <ul class="menu">
        <li><!-- start message -->
    <div class="pull-left"><!-- User Image -->
    <img class="img-circle" src="{{ asset('dist/img/user2-160x160.jpg') }}" alt="User Image" /></div>
    <!-- Message title and timestamp -->
    <h4>Support Team
    <small><i class="fa fa-clock-o"></i> 5 mins</small></h4>
    <!-- The message -->

    Why not buy a new awesome theme?</li>
    </ul>
    </ul>
    <!-- end message -->

    <!-- /.menu --></li>
        <li class="footer"><a href="#">See All Messages</a></li>
    </ul>
    </li>
    </ul>
    </ul>
    <!-- /.messages-menu -->

    <!-- Notifications Menu -->
    <ul class="nav navbar-nav">
    <ul class="nav navbar-nav">
        <li class="dropdown notifications-menu"><!-- Menu toggle button -->
    <a class="dropdown-toggle" href="#" data-toggle="dropdown">
    <i class="fa fa-bell-o"></i>
    <span class="label label-warning">10</span>
    </a>
    <ul class="dropdown-menu">
        <li class="header">You have 10 notifications</li>
        <li><!-- Inner Menu: contains the notifications -->
    <ul class="menu">
    <ul class="menu">
        <li><!-- start notification -->
    <a href="#">
    <i class="fa fa-users text-aqua"></i> 5 new members joined today
    </a></li>
    </ul>
    </ul>
    <!-- end notification --></li>
        <li class="footer"><a href="#">View all</a></li>
    </ul>
    </li>
    </ul>
    </ul>
    <!-- Tasks Menu -->
    <ul class="nav navbar-nav">
    <ul class="nav navbar-nav">
        <li class="dropdown tasks-menu"><!-- Menu Toggle Button -->
    <a class="dropdown-toggle" href="#" data-toggle="dropdown">
    <i class="fa fa-flag-o"></i>
    <span class="label label-danger">9</span>
    </a>
    <ul class="dropdown-menu">
        <li class="header">You have 9 tasks</li>
        <li><!-- Inner menu: contains the tasks -->
    <ul class="menu">
    <ul class="menu">
        <li><!-- Task item -->
    <a href="#">
    <!-- Task title and progress text --></a>
    <h3>Design some buttons
    <small class="pull-right">20%</small></h3>
    <!-- The progress bar -->
    <div class="progress xs"><!-- Change the css width attribute to simulate progress -->
    <div class="progress-bar progress-bar-aqua" style="width: 20%;"><span class="sr-only">20% Complete</span></div>
    </div></li>
    </ul>
    </ul>
    <!-- end task item --></li>
        <li class="footer"><a href="#">View all tasks</a></li>
    </ul>
    </li>
    </ul>
    </ul>
    <!-- User Account Menu -->
    <ul class="nav navbar-nav">
    <ul class="nav navbar-nav">
        <li class="dropdown user user-menu"><!-- Menu Toggle Button -->
    <a class="dropdown-toggle" href="#" data-toggle="dropdown">
    <!-- The user image in the navbar-->
    <img class="user-image" src="{{ asset('dist/img/user2-160x160.jpg') }}" alt="User Image" />
    <!-- hidden-xs hides the username on small devices so only the image appears. -->
    <span class="hidden-xs">Alexander Pierce</span>
    </a>
    <ul class="dropdown-menu">
    <ul class="dropdown-menu"><!-- The user image in the menu -->
        <li class="user-header"><img class="img-circle" src="{{ asset('dist/img/user2-160x160.jpg') }}" alt="User Image" />Alexander Pierce - Web Developer
    <small>Member since Nov. 2012</small></li>
    </ul>
    </ul>
    <!-- Menu Body -->
    <ul class="dropdown-menu">
    <ul class="dropdown-menu">
        <li class="user-body">
    <div class="col-xs-4 text-center"><a href="#">Followers</a></div>
    <div class="col-xs-4 text-center"><a href="#">Sales</a></div>
    <div class="col-xs-4 text-center"><a href="#">Friends</a></div></li>
    </ul>
    </ul>
    <!-- Menu Footer-->
    <ul class="dropdown-menu">
        <li class="user-footer">
    <div class="pull-left"><a class="btn btn-default btn-flat" href="#">Profile</a></div>
    <div class="pull-right"><a class="btn btn-default btn-flat" href="#">Sign out</a></div></li>
    </ul>
    </li>
    </ul>
    </ul>
    <!-- Control Sidebar Toggle Button -->

    </div>
    </nav></header>
  5. 5. Now, go back to admin.blade.php and cut out the <aside> sidebar section and paste it into a new view called sidebar.blade.php. As in the previous step, change any hyperlinks or file references so they use the Laravel “asset” help function. Save this file in the “includes” folder.
    1
    2
    3
    4
    5
    6
    7
    8
    9
    10
    11
    12
    13
    14
    15
    16
    17
    18
    19
    20
    21
    22
    23
    24
    25
    26
    27
    28
    29
    30
    31
    32
    33
    34
    35
    36
    37
    38
    39
    40
    41
    42
    43
    <!-- Left side column. contains the logo and sidebar --><aside class="main-sidebar"><!-- sidebar: style can be found in sidebar.less --><section class="sidebar"><!-- Sidebar user panel (optional) -->
    <div class="user-panel">
    <div class="pull-left image"><img class="img-circle" src="{{ asset('dist/img/user2-160x160.jpg') }}" alt="User Image" /></div>
    <div class="pull-left info">

    Alexander Pierce

    <!-- Status -->
    <a href="#"><i class="fa fa-circle text-success"></i> Online</a>

    </div>
    </div>
    <!-- search form (Optional) -->

    <form class="sidebar-form" action="#" method="get">
    <div class="input-group"><input class="form-control" name="q" type="text" placeholder="Search..." />
    <span class="input-group-btn">
    <button id="search-btn" class="btn btn-flat" name="search" type="submit"><i class="fa fa-search"></i></button>
    </span></div>
    </form><!-- /.search form -->

    <!-- Sidebar Menu -->
    <ul class="sidebar-menu">
    <ul class="sidebar-menu">
        <li class="header">HEADER</li>
    </ul>
    </ul>
    <!-- Optionally, you can add icons to the links -->
    <ul class="sidebar-menu">
        <li class="active"><a href="#"><i class="fa fa-link"></i> Link</a></li>
        <li><a href="#"><i class="fa fa-link"></i> Another Link</a></li>
        <li class="treeview"><a href="#"><i class="fa fa-link"></i> Multilevel <i class="fa fa-angle-left pull-right"></i></a>
    <ul class="treeview-menu">
        <li><a href="#">Link in level 2</a></li>
        <li><a href="#">Link in level 2</a></li>
    </ul>
    </li>
    </ul>
    <!-- /.sidebar-menu -->

    </section><!-- /.sidebar -->

    </aside>
  6. 6. Repeat these steps for the <footer> and <control> sidebar sections. Name the files footer.blade.php and controlsidebar.blade.php.footer.blade.php
    1
    2
    3
    4
    5
    6
    7
    8
    <!-- Main Footer -->

    <footer class="main-footer"><!-- To the right -->
    <div class="pull-right hidden-xs">Anything you want</div>
    <!-- Default to the left -->
    <strong>Copyright © 2015 <a href="#">Company</a>.</strong> All rights reserved.

    </footer>

    controlsidebar.blade.php

    1
    2
    3
    4
    5
    6
    7
    8
    9
    10
    11
    12
    13
    14
    15
    16
    17
    18
    19
    20
    21
    22
    23
    24
    25
    26
    27
    28
    29
    30
    31
    32
    33
    34
    35
    36
    37
    38
    39
    40
    41
    42
    43
    44
    45
    46
    <!-- Control Sidebar -->

    <aside class="control-sidebar control-sidebar-dark"><!-- Create the tabs --><!-- Tab panes -->
    <div class="tab-content"><!-- Home tab content -->
    <div id="control-sidebar-home-tab" class="tab-pane active">
    <h3 class="control-sidebar-heading">Recent Activity</h3>
    <ul class="control-sidebar-menu">
        <li><a>
    <i class="menu-icon fa fa-birthday-cake bg-red"></i></a>
    <div class="menu-info">
    <h4 class="control-sidebar-subheading">Langdon's Birthday</h4>
    Will be 23 on April 24th

    </div></li>
    </ul>
    <!-- /.control-sidebar-menu -->
    <h3 class="control-sidebar-heading">Tasks Progress</h3>
    <ul class="control-sidebar-menu">
        <li>
    <h4 class="control-sidebar-subheading">Custom Template Design
    <span class="label label-danger pull-right">70%</span></h4>
    </li>
    </ul>
    <!-- /.control-sidebar-menu -->

    </div>
    <!-- /.tab-pane -->
    <!-- Stats tab content -->
    <div id="control-sidebar-stats-tab" class="tab-pane">Stats Tab Content</div>
    <!-- /.tab-pane -->
    <!-- Settings tab content -->
    <div id="control-sidebar-settings-tab" class="tab-pane"><form method="post">
    <h3 class="control-sidebar-heading">General Settings</h3>
    <div class="form-group"><label class="control-sidebar-subheading">
    Report panel usage
    <input class="pull-right" checked="checked" type="checkbox" />
    </label>Some information about this general settings option</div>
    <!-- /.form-group -->

    </form></div>
    <!-- /.tab-pane -->

    </div>
    </aside><!-- Add the sidebar's background. This div must be placed
    immediately after the control sidebar -->
    <div class="control-sidebar-bg"></div>
  7. Add the “include” statements for the newly-created sub-views in admin.blade.php, as shown below
    1
    2
    3
    4
    @include('includes.header');
    @include('includes.sidebar');
    @include('includes.footer');
    @include('includes.controlsidebar');
  8. Also in admin.blade.php, add the section between sidebar and footer. Copy and past section <div class=”content-wrapper”>(see below) where we will host the code in which phpGrid will be rendered. Also include @yield(‘content’) in <section class=”content”> section.
    1
    2
    3
    4
    5
    6
    7
    8
    9
    10
    11
    12
    13
    14
    15
    16
    17
    18
    19
    20
    21
    22
    23
    24
    25
    26
    27
    <div class="wrapper">

    @include('includes.header')
    @include('includes.sidebar')

    <!-- Content Wrapper. Contains page content -->
    <div class="content-wrapper"><!-- Content Header (Page header) -->
    <section class="content-header">
    <h1>Page Header
    <small>Optional description</small></h1>
    <ol class="breadcrumb">
        <li><a href="#"><i class="fa fa-dashboard"></i> Level</a></li>
        <li class="active">Here</li>
    </ol>
    </section><!-- Main content -->

    <section class="content"><!-- Your Page Content Here -->
    @yield('content')</section><!-- /.content -->

    </div>
    <!-- /.content-wrapper -->

    @include('includes.footer')
    @include('includes.controlsidebar')

    </div>
    <!-- ./wrapper -->
  9. Move the required javascript found at the bottom of “starter.html” to <head> section (not <header>!) in admin.blade.php.
    1
    2
    3
    4
    5
    6
    7
    8
    9
    10
    11
    <!– REQUIRED JS SCRIPTS --!>
    <!– jQuery 2.1.4 –->
    <script src="”{{"></script>
     <!– Bootstrap 3.3.2 JS –>
    <script src="”{{" type="”text/javascript”"></script>
    <!– AdminLTE App –>
    <script src="”{{" type="”text/javascript”"></script>
    <!– Optionally, you can add Slimscroll and FastClick plugins.
    Both of these plugins are recommended to enhance the
    user experience. Slimscroll is required when using the
    fixed layout. –>
  10. We are almost done. In admin.blade.php, make sure to change any hyperlinks or file references to use Laravel “asset” help function.


Create “dashboard.blade.php” Child Template View


We just created our admin layout by dividing the file “starter.html” into various views and sub-views and saving them as PHP files. “admin.blade.php” will be our parent layout – the one that will be used as a basis for all other admin layouts and the file from which these other layouts will extend. $grid is the variable that holds the PHP datagrid passed from route next.

1
2
3
4
5
@extends('admin')

@section('content')
{!! $grid !!}
@endsection


Where Is phpGrid??


Up until now, the walk-through has addressed converting AdminLTE to Laravel views. Everything in Laravel 5 is autoloaded using PSR-4 within the app/ directory. You can also see this in the composer.json file.

Although we foresee the capability in future releases, for backward compatibility reasons, phpGrid currently does not support the namespace construct. Without namespace support, we cannot call our C_DataGrid class from directly within the Laravel Controller. The workaround is to call phpGrid directly from a route file. For this reason, instead of storing phpGrid in the app/ directory, we place the phpGrid components in the public folder.

So, go ahead and download a copy of phpGrid if you haven’t already done so, and extract the files into the Laravel “public” folder. Complete the installation by configuring the conf.php file. For instructions on how to do this, see setup phpGrid configuration.

Once you have completed the previous step, in the Laravel route file “app/Http/routes.php”, copy and paste the following code snippet:

1
2
3
4
5
6
7
8
9
10
11
12
Route::get(‘dashboard’, function () {
require_once(public_path() ./phpGrid_Lite/conf.php”);

$dg = new C_DataGrid(“SELECT * FROM orders”, “orderNumber”, “orders”);
$dg->enable_edit(“INLINE”, “CRUD”);
$dg->enable_autowidth(true)->enable_autoheight(true);
$dg->set_theme(‘cobalt-flat’);
$dg->display(false);

$grid = $dg -> get_display(true); // do not include required javascript libraries until later with with display_script_includeonce method.
return view(‘dashboard’, [‘grid’ => $grid]);
});

That’s it. You can now run the demo.

Run Demo


Where is the controller?


Now, you are probably going to ask, “Where is Laravel controller for our view?” The answer is it is simply not needed for our datagrid. The route we created in a previous step essentially controls the view for us. In a perfect world, the controller would be where all logic and pass information for rendering views would be handled. However, phpGrid’s currently does not support namespace that it is impossible for to call the phpGrid library from within the Laravel Controller. In a future phpGrid release which offers namespace support, this workaround will no longer be necessary.


Screenshot

phpgrid-laravel5-bootstrap3-full-edit


Reference:

The post phpGrid, Laravel 5 and Bootstrap 3 appeared first on phpGrid.

phpGrid and CodeIgniter Integration

$
0
0
phpGrid-Codeigniter-outcome

Introduction

It’s easy to integrate CodeIgniter with phpGrid. CodeIgniter is a popular, open source PHP framework loosely based on MVC development pattern for use in building dynamic web sites. Out of box, phpGrid is a read-to-use PHP datagrid solution.


Install CodeIgniter

Download CodeIgniter here. CodeIgniter is installed in four steps:

  1. Unzip the package.
  2. Upload the CodeIgniter folders and files to your server. Normally the index.php file will be at your root.
  3. Open the application/config/config.php file with a text editor and set your base URL. If you intend to use encryption or sessions, set your encryption key.
  4. If you intend to use a database, open the application/config/database.php file with a text editor and set your database settings.


Install phpGrid

Download phpGrid here. Install phpGrid in the followings steps:

  1. Unzip the phpGrid download file.
  2. Upload unzipped phpGrid folder to “aplication/libraries” folder.
  3. Complete the installation by configuring the conf.php file. For instructions on how to do this, see setup phpGrid configuration.


CodeIgniter Controller

For the sake of this tutorial, we will directly modify the default controller file “Welcome.php”. In practice, it can be any existing or new controller file. Pay attention that we did not initialize the class using the standard:

1
$this->load->library('someclass');

Where someclass is the file name, without the “.php” file extension. Instead we simply include phpGrid configuration file. APPPATH constant is path to your application folder. Unlike Laravel framework, you can directly include PHP classes and working with them. phpGrid is a complex component and composed of multiple classes.

1
2
3
4
5
6
7
8
9
public function index()
{
    // $this->load->view('welcome_message');

    require_once(APPPATH. 'libraries/phpGrid_Lite/conf.php'); // APPPATH is path to application folder
    $data['phpgrid'] = new C_DataGrid("SELECT * FROM Orders", "orderNumber", "Orders"); //$this->ci_phpgrid->example_method(3);

    $this->load->view('show_grid',$data);
}

Note the last line is our new view we are about to create. The view is called “show_grid”.

phpGrid-Codeigniter-code


Create View

Our view is very simple in this tutorial.  All you have to do is to put  <?php $phpgrid->display(); ?> somewhere in the view. Learn more about creating a basic PHP grid here.

1
2
3
4
5
6
7
8
9
10
11
12
13
14
15
16
17
18
19
20
21
<?php
defined('BASEPATH') OR exit('No direct script access allowed');
?><!DOCTYPE html>
<html lang="en">
<head>
    <meta charset="utf-8">
    <title>Show Grid</title>
</head>
<body>

<div id="container">
    <h1>Welcome to CodeIgniter! Show me the grid!</h1>

    <div id="body">
        <?php $phpgrid->display(); ?>
    </div>

</div>

</body>
</html>

That’s it! phpGrid handles all the CRUD operations. We don’t need to create Model for PHP datagrid to run in CodeIgniter.

Screenshot

phpGrid-Codeigniter-outcome

CodeIgniter and PHP Session

It is recommended to stick to native PHP session in CI. By default, CI stores session in cookie, neither is secure nor efficient. You can also use “out of proc” session by storing session info in a database. The later is more sophisticated but inevitable more complex. Usually not it is recommended unless you need to develop large a eCommerce website that requires session persistent shopping cart. phpGrid also uses native PHP session to store secure data such as database connection and sql data.

If you are using native PHP session, in php.ini, make sure “save_path” value is set to an existing folder with written permission.

http://php.net/manual/en/session.configuration.php#ini.session.save-path

The post phpGrid and CodeIgniter Integration appeared first on phpGrid.

Google Spreadsheet Integration

$
0
0

You can also use Google Spreadsheet as a data source to populate your datagrid. In this tutorial, you will learn how to create a shared Google Spreadsheet and share it in comma-separated values (CSV) format. Note that array data source is a feature only available in Enterprise license.

Loading from Google Spreadsheet is straight forward as if loading from a local array data source. first of all, in order for our system to download the Google Spreadsheet in CSV format, you need to follow this guide to generate a download link for the CSV file of Google Drive Spreadsheet.


Open a Google Drive Spreadsheet


Open an existing Google Spreadsheet like the following:

google-spreadsheet-original


Share the Google Spreadsheet

  1. Click Change… to change access settings,
  2. Click “Public on the Web” or “Anyone with the link”,
  3. Click Save
     

    google-spreadsheet-sharing


Publish on the Web

  1. Click File >Publish on the Web


    google-spreadsheet-publish-menu

  2. Click “Advanced”, and make sure “Automatically republish when changes are made” is checked.google-spreadsheet-publish
     
  3. Choose “Comma-separated values (.csv) as output type in Link type drop-down
     

    google-spreadsheet-share-csv-output

     
  4. Finally copy document link.You should have a link similar to the following with output=csv in URL parameter:
    https://docs.google.com/spreadsheets/d/1IvbMsUZTCdY7duciT3lWSXHPP_qPDG8FrJl8dq1ZbI/pub?output=csv
     

    google-spreadsheet-share-link


Start Coding

First of all, we need to massage our data into format that phpGrid can recognize. You can read more about it in local array data data example. In our Google Spreadsheet sample file, the first row contains the header information. We will also extract that row as the name for each column in datagrid. After formatting, the data become accessible as if it is a local file.

1
2
3
4
5
6
7
8
9
10
11
12
$spreadsheet_url = 'https://docs.google.com/spreadsheets/d/1IvbMsUZTCdYb5z34jT3lWSXHPP_qPDG8FrJl8dq1ZbI/pub?output=csv';
$csv = file_get_contents($spreadsheet_url);
$rows = explode("\n",$csv);
$data = array();
$names = array();
for($i=0; $i<count($rows); $i++) {
if($i==0){
$names = str_getcsv($rows[$i]);
}else{
$data[] = str_getcsv($rows[$i]);
}
}

Finally, we add our phpGrid code. We first add title to each datagrid column. We also enable auto filter in integrated search, and lastly give it a new look using our premium theme “aristo”.

Please note that search auto filter is a new feature that dynamically generates filter drop-down in integrated toolbar search based on column’s unique values. Since Google Spreadsheet does not send separate column header in its .csv format, here we use column index array, e.g. array(1,2,3,5), as our search auto filter.

1
2
3
4
5
6
$dg = new C_DataGrid($data, "id", "Google_Spreadsheet");
for($i=0; $i<count($names); $i++) { $dg->set_col_title($i, $names[$i]);
}
$dg->enable_search(true, array(1,2,3,5));
$dg->set_theme('aristo');
$dg->display();

That’s how you populate datagrid from a Google Spreadsheet. Enjoy!

The post Google Spreadsheet Integration appeared first on phpGrid.

phpGrid and Zend Framework Integration

$
0
0
zf2-phpgrid

Introduction


This tutorial will walk you through the integration of the Zend Framework 2 and phpGrid. Zend Framework (ZF) is a popular open source, MVC web application framework created and maintained by Zend Technologies, the company behind PHP programming language.


Install Zend Framework Skeleton Application


The best way to create a Zend Framework project is to use Composer. This tutorial uses Zend Framework version 2.4 that requires PHP version 5.5 and above. In this tutorial, you will start by installing the ZendSkeletonApplication from Github using Composer. It’s a great starting point to begin a blank Zend project.

Create your new ZF2 project:

1
composer create-project -n -sdev zendframework/skeleton-application path/to/install

path/to/install should be a folder in web root.


Install phpGrid


Before installing phpGrid, in the ZF2 that we installed in the previous step, find the “vendor” folder, and create a new directory named “phpcontrols” inside. Then download phpGrid and extract the zip file into the “phpcontrols” folder we just created.

You should have folder structure similar to the following screenshot:

zendframework-folder


Configuring conf.php file in phpGrid

Complete the phpGrid installation by configuring its database information in file “conf.php” inside phpGrid folder. For complete instructions on how to do this, see phpGrid configuration online documentation. phpGrid comes with several sample databases. You can find them under “examples/SampleDB” folder. We will use the MySql sample database for Zend Framework integration tutorial.

Modify composer.json

Before start coding, we need to register our phpGrid library in Zend Framework autoloader by adding autoload files keys in composer.json. Autoloader ensures that any PHP external libraries and components can be easily referenced anywhere in PHP code without using the traditional require or php include function.

Below is a copy of our composer.json. It could be slightly from what you have, and notice the autoload value.

1
2
3
4
5
6
7
8
9
10
11
12
13
14
15
16
17
{
    "name": "zendframework/skeleton-application",
    "description": "Skeleton Application for ZF2",
    "license": "BSD-3-Clause",
    "keywords": [
        "framework",
        "zf2"
    ],
    "homepage": "http://framework.zend.com/",
    "require": {
        "php": ">=5.5",
        "zendframework/zendframework": "~2.5"
    },
    "autoload":{
        "files": ["vendor/phpcontrols/phpGrid/conf.php"]
    }
}

Finally, update composer after making the changes. In the project root, run the following

1
composer update


Start coding!


Open file “module/Application/view/application/index/index.phtml“. Assuming that you have installed phpGrid sample database installed,. Somewhere in index.phtml, add the following:

1
2
3
$dg = new \C_DataGrid("SELECT * FROM orders", "orderNumber", "orders");
$dg -> enable_edit("INLINE", "CRUD");
$dg -> display();

Note that if you are under a namespace while creating the object, you must use the “\” (root namespace), otherwise you will use the phpGrid class under the current namespace.

That’s all there it is. You should be able to run the demo.

Run Demo


What about the controller and model?

You are probably wondering, “Where is the ZF controller and model for phpGrid?” The answer is they are simply not required. phpGrid encapsulates both database access routines and display so you don’t have to worry about them. It does those magic “behind the scene”.

The post phpGrid and Zend Framework Integration appeared first on phpGrid.

phpGrid Now Has Better IBM DB2 Support!

$
0
0
phpgrid-db2


After months of hard work, phpGrid now finally has native IBM DB2 database support! phpGrid’s DB2 support has been spotty in the past, owing to the fact that the ADOBdb data access library uses non-supported legacy IBM DB2 driver. A new PDO data access class has been implemented specifically for DB2.*

We tried uber-hard to make sure that the existing phpGrid API stayed the same. The changes made were essential, and they are transparent to our users. Simply use the new database by typing “pdo_odbc_db2” as the PHPGRID_DB_TYPE value in conf.php, and everything else stays the same.


IBM i Developers, Rejoice.


A large number of IBM i developers have been working with DB2, the IBM’s Relational Database Management System (RDBMS). You can use phpGrid as your data management tool in your IBM i environment because the PHP runtime is already preloaded with IBM i. This means, they can get a super-charged datagrid with built-in CRUD capability, up and working very quickly without much knowledge of the ins and outs of PHP.

The DB2 was fully tested in IBM DB2 Express-C. It requires PDO_ODBC(unixODBC) extension. As of PHP 5.1, PDO_ODBC is included in the PHP source. You should verify it in phpinfo. Both web server and DB2 must be on the same server. If you have trouble install unixODBC, I suggest install Zend Server (free) to easily install PDO_ODBC (unixODBC) extension through its wonderful admin dashboard. Lastly, set up the DSN in odbc.ini and odbcinst.ini configuration files.

odbc.ini

1
2
3
[sample]
Description = Test to DB2
Driver      = DB2

odbcinst.ini

1
2
3
4
5
6
[db2]
Description = DB2 Driver
Driver      = /opt/ibm/db2/V10.5/lib32/libdb2.so
Driver64    = /opt/ibm/db2/V10.5/lib64/libdb2.so
FileUsage   = 1
DontDLClose = 1

*Note that DB2 support is available with an Enterprise license.


A sample of conf.php in phpGrid. Notice the putenv environment variable settings.

conf.php

1
2
3
4
5
6
7
8
9
10
define('PHPGRID_DB_HOSTNAME', 'localhost'); // database host name
define('PHPGRID_DB_PORT', '50000'); // database host name
define('PHPGRID_DB_USERNAME', 'db2inst1');     // database user name
define('PHPGRID_DB_PASSWORD', 'xxxxxxxx'); // database password
define('PHPGRID_DB_NAME', 'SAMPLE'); // database name or DSN name (cataloged)
define('PHPGRID_DB_TYPE', 'pdo_odbc_db2');  // database type
define('PHPGRID_DB_CHARSET','utf8'); // ex: utf8(for mysql),AL32UTF8 (for oracle), leave blank to use the default charset

putenv('ODBCSYSINI=/etc');
putenv('ODBCINI=/etc/odbc.ini');

Finally, the sample code using the DB2 db2sampl database:

1
2
3
4
5
6
7
8
9
10
11
12
13
14
15
16
17
18
$dg = new C_DataGrid("SELECT * FROM EMPLOYEE", "EMPNO", "EMPLOYEE");
$dg->set_col_title('EMPNO', 'Employee #');
$dg->set_col_title('PHONENO', 'Phone Number');
$dg->set_col_width('SEX', 50)->set_col_align('SEX', 'center');
$dg->set_col_width('MIDINIT', 30)->set_col_align('MIDINIT', 'center');
$dg->enable_search(true);
$dg->enable_edit('FORM');
$dg->enable_export('CSV');
$dg->enable_autowidth(true);
$dg->set_col_edittype('WORKDEPT', 'select', 'select DEPTNO, DEPTNAME from DEPARTMENT');
$dg->set_col_edittype('SEX', 'select', 'M:M;F:F');
$dg->set_conditional_format("SEX","CELL",array(
    "condition"=>"eq","value"=>"F","css"=> array("color"=>"black","background-color"=>"#FDA6B2")));
$dg->set_conditional_format("SEX","CELL",array(
    "condition"=>"eq","value"=>"M","css"=> array("color"=>"black","background-color"=>"#A6D7FC")));
$dg->set_conditional_format("SALARY","CELL",array(
    "condition"=>"gt","value"=>75000,"css"=> array("color"=>"black","background-color"=>"lightgreen")));
$dg -> display();

Sample datagrid output:
 

phpgrid-db2sampl-employee

The post phpGrid Now Has Better IBM DB2 Support! appeared first on phpGrid.

phpGrid, Laravel 5 Integration – Part II (Improved version)

$
0
0

In the previous phpGrid Laravel 5 tutorial part 1, we have chosen to leave the phpGrid code inside route.php. In this tutorial, we will improve upon what we have learned in part 1. We will move the phpGrid folder out of public directory and move it to app folder instead; and then we will undo changes in route.php and add phpGrid code inside controller file.

Let’s get started.


Move phpGrid folder into Laravel \app folder


Technically, you can put a class itself anywhere you want within \app folder. I personally prefer to create a separate one such as app\Libraries for any external libraries.

Make sure to udpate SERVER_ROOT value in conf.php. See below folder structure

phpgrid laravel5 part2 folder structure


Undo changes made in route.php


In route.php, undo the dashboard route changes back we made in Part I back to default. We will be moving the phpGrid code to controller as it is the properly place to organize your application behaviors.

1
Route::get('dashboard', 'DashboardController@index');


A better way to include an external library in Laravel 5


Apparently it’s possible to include PHP classes without namespace in controller. Strictly speaking, we will be using the “\” (root namespace) as the default namespace.

First of all, let’s get autoloader to work.

Modify composer.json

Before start coding, we need to register our phpGrid library in Laravel autoloader by adding autoload files keys in composer.json. Autoloader ensures that any PHP external libraries and components can be easily referenced anywhere in PHP code without using the traditional require or php include function.

Below is a copy of our composer.json. It could be slightly from what you have, and notice the autoload value.

1
2
3
4
5
6
7
8
9
    "autoload": {
        "classmap": [
            "database"
        ],
        "psr-4": {
            "App\\": "app/"
        },
        "files": ["app/Libraries/phpGrid_Lite/conf.php"]
    },

Notice: if you make these changes to composer.json file, don’t forget to run composer dump-autoload or composer update for changes to take effect.

1
composer dump-autoload

– OR –

1
composer update


Modify DashboardController.php


Open DashboardController.php in “app\Http\Controllers” folder, and change the index() function to the following. Note that if you are under a namespace while creating the object, you must use the “\” (root namespace), otherwise you will use the phpGrid class under the current namespace.

1
2
3
4
5
6
7
8
9
10
11
12
13
public function index()
{
    $dg = new \C_DataGrid("SELECT * FROM orders", "orderNumber", "orders");
    $dg->enable_edit("FORM", "CRUD");
    $dg->enable_autowidth(true)->enable_autoheight(true);
    $dg->set_theme('cobalt-flat');
    $dg->set_grid_property(array('cmTemplate'=>array('title'=>false)));
    $dg->display(false);

    $grid = $dg -> get_display(true);

    return view('dashboard', ['grid' => $grid]);
}

That’s all there it is. You should be able to run the demo.

Run Demo

reference:
http://laraveldaily.com/how-to-use-external-classes-and-php-files-in-laravel-controller/

The post phpGrid, Laravel 5 Integration – Part II (Improved version) appeared first on phpGrid.


Announcing phpGrid v6.7

$
0
0

Today we released phpGrid version 6.7. It updates several major core components to support PHP 7.

List of main changes:

  • PHP 7 support!
  • PDF class updated to support PHP 7
  • Native Excel export (requires PHPExcel)
  • ADOdb 5.20 data access library update for PHP 7 support
  • Bug fix subgrid to add readonly fields support
  • Minor theme update.

New and updated online demos:

  1. Column auto width. Noted in green banner.
  2. Pivot grid
  3. New date format demo
  4. New header tooltip function set_col_headerTooltip 

Thank you and have a grid day!

Richard

The post Announcing phpGrid v6.7 appeared first on phpGrid.

phpGrid Symfony Integration

$
0
0
symfony-logo

Files needed for this demo


Where to keep phpGrid files in Symfony (Hint: not in “vendor” folder)

The short answer is “web” folder. Symfony web assets are used to keep things like CSS, JavaScript and image files that renders the front-end of your site. phpGrid encapsulates both database access routines and display so you don’t have to worry about them. It does this magic “behind the scenes”.

Edit conf.php in phpGrid

Remember to change the database credentials in conf.php. You do not need to set SERVER_ROOT value because phpGrid is inside public accessible “web” folder.

Enable PHP templating engine

Before we start phpGrid Symfony integration, make sure the “php” templating engine is enabled in your application configuration file under app/config .Symfony defaults to Twig for its template engine, but you can still use plain PHP code if you want. Symfony adds some nice features on top of PHP to make writing templates with PHP more powerful.

1
2
3
4
5
# app/config/config.yml
framework:
    # ...
   templating:
        engines: ['twig', 'php']

Create Symfony Controller

Symfony Controller needs to call our grid view file because we do not want to use Controller to render our datagrid. In this demo, we will modify the default controller located in folder “src/AppBundle/Controller/”. For simplicity, we keep the route path the same as the view folder structure.

1
2
3
4
5
6
7
8
/**
 * @Route("/phpgrid/simple")
 */

public function gridAction(){
   
   return $this->render('phpgrid/simple.html.php');

}

Create Symfony View file

First of all, create a new folder named “phpgrid” in “app/Resources/views”. Secondly, create a view file named “simple.html.php”, or whatever view file name used in your Controller in the previous step.

Include the phpGrid config file.

1
2
$webDir = $this->container->getParameter('kernel.root_dir');
require_once($webDir ."/../web/phpGrid_Lite/conf.php");

Load a simple datagrid from phpGrid sample database table “orders” (The sample database is located under examples/SampleDB)

1
2
$dg = new C_DataGrid("SELECT * FROM orders", "orderNumber", "orders");
$dg->display();

Congrats! You’ve just created your first datagrid in Symfony! Now visit “your_domain.com/phpgrid/simple” to see the datagrid.


Download complete demo files

The post phpGrid Symfony Integration appeared first on phpGrid.

Database Content Administration Application in 15 Lines of PHP Code

$
0
0
db-admin-demo

The source code of this tutorial is publicly available on Github.

Introduction

We will learn how to build a fully functional, single-page database content administration application using phpGrid and other PHP components with a minimum amount of code. The application will perform common data operations such as Create, Read, Update, Delete, otherwise known as CRUD on MySQL database tables.

Note the demo application requires phpGrid version 7 and above. The demo uses MySQL, however, the same basic code should work with other databases with the use of a different SQL schema SELECT statement.

Design

Our application will have a list of database schemas and tables on the left side – the sidebar – and a database table on the main screen – the main. Both the sidebar and the main are datagrids. On the main datagrid, which contains the database table, we will also add a search bar so users can search within the displayed grid.

Our design mockup:

db-admin-mockup

2-Column Layout

Let’s start by creating the layout. What we need is a fixed-width sidebar on the left while the main – a grid – stays “fluid” so it fills the remaining document width. The main grid will be populated with data from the database table selected from the left sidebar.

Luckily, CSSPortal has an excellent layout tool which easily generates a column-based layout with only point and click.

http://www.cssportal.com/layout-generator/

An alternative is to download this boilerplate (File -> Save As) which contains all the HTML and CSS code needed for this demo application.

Setup

Let’s start coding. Presumably, you have already installed phpGrid on your web server. If not, follow this guide to learn how – http://phpgrid.com/documentation/installation/

First, add the following lines to the TOP of our page

1
2
use phpGrid\C_DataGrid;
require_once("phpGrid/conf.php");

The first line adds the phpGrid namespace so PHP knows where to find phpGrid in the system. Otherwise, PHP will throw a nasty error – “Fatal error: Class ‘C_DataGrid’ not found”.

The second line references phpGrid by including its conf.php. The Installation Guide – http://phpgrid.com/documentation/installation/ – explains this in greater length.

Sidebar

The left sidebar contains a list of the tables found in each respective database in a subgrid.

Sidebar – Step 1

The first step is to return a list of current schemata from the selected database. In MySQL, the following SQL statement retrieves a list of schema names.

1
SELECT SCHEMA_NAME FROM INFORMATION_SCHEMA.SCHEMATA

The PHP code to return a list of schemas is as follows:

1
2
3
4
// schema list
$dbs = new C_DataGrid("SELECT SCHEMA_NAME FROM INFORMATION_SCHEMA.SCHEMATA", "SCHEMA_NAME", "INFORMATION_SCHEMA.SCHEMATA");
$dbs->set_dimension('300px');
$dbs->set_pagesize(999)->set_scroll(true);

How the above code works:

set_dimension sets the width of the left sidebar to 300 pixels.
set_pagesize sets the height of the page to a very large number, e.g. 999. Thus, all data will be displayed on a single page. set_scroll removes the pagination controls normally found in the bottom footer.

Sidebar – Step 2

The second step displays a list of available database tables in each schema in a subgrid.

The PHP code to return a list of tables appears below.

1
2
3
4
// table list    $tbl = new C_DataGrid("SELECT TABLE_NAME, TABLE_SCHEMA, TABLE_ROWS FROM INFORMATION_SCHEMA.TABLES", "TABLE_NAME", "INFORMATION_SCHEMA.TABLES");
$tbl->set_col_hidden('TABLE_SCHEMA');
$tbl->set_pagesize(999)->set_scroll(true);
$tbl -> set_col_dynalink("TABLE_NAME", "db_admin.php", array("TABLE_NAME", "TABLE_SCHEMA"), '', "_top");

How the above code works:

First, we hide the TABLE_SCHEMA column because it is redundant. The page size is set to a large number (999) and scroll is set to true. Finally, and  most importantly, set_col_dynalink forms a dynamic URL for each database table used to populate the main datagrid.  You can learn more about the set_col_dynalink function here: http://phpgrid.com/documentation/set_col_dynalink/

Sidebar – Step 3

Lastly, set the subgrid. The subgrid displays an inline detail grid for each row in the parent grid. If you are not familiar with phpGrid subgrids, check out the subgrid demo online – http://phpgrid.com/example/subgrid/.

1
2
$dbs->set_subgrid($tbl, 'TABLE_SCHEMA', 'SCHEMA_NAME');
$dbs->display();

db-admin-sidebar

Main Column

The main column contains the datagrid for the database table. Recall that in the code to create the sidebar, Step 2, we used a function called “set_col_dynalink” which set a dynamic URL for every database table name in the URL query string. Now we need to retrieve the schema name and table name by using the following code:

1
2
$schemaName = (isset($_GET['TABLE_SCHEMA']) && isset($_GET['TABLE_SCHEMA']) !== '') ? $_GET['TABLE_SCHEMA'] : 'sampledb';
$tableName = (isset($_GET['TABLE_NAME']) && isset($_GET['TABLE_NAME']) !== '') ? $_GET['TABLE_NAME'] : 'orders';

The first line of code gets the schema name and the second gets the table name. There’s nothing special about this except we set a default value for each variable to be used in cases where the parameters are missing – such as as when the page is first loaded.

Below is the code for the main grid:

1
2
3
4
5
6
7
8
9
$dg = new C_DataGrid("SELECT * FROM $tableName",'orderNumber', "$tableName",
array("hostname"=>"localhost",
"username"=>"root",
"password"=>"",
"dbname"=>$schemaName,
"dbtype"=>"mysql",
"dbcharset"=>"utf8"));
$dg->enable_global_search(true);
$dg -> display();

How the above code works:

The first line uses phpGrid’s multiple database reference feature. This is essential because we need to reference different tables found in different databases. See http://phpgrid.com/example/multiple-databases-support/ for more information about how phpGrid can be configured to work with multiple databases.

Note that it is important to use the correct corresponding primary key when referencing the default database table.  In this case, we are referencing the “orders” table with the primary key “orderNumber”.

enable_global_search adds the global search bar to top of the grid. Finally, the last line displays our datagrid.

db-admin-main

That’s all there is to it! You now have a web-based database content management console using fewer than 15 lines of code.

But Wait, There’s More!

We can beef up the grid and take advantage of the fluid layout design by adding a few more lines of code.

First, we add a caption to show the current schema and table name. Then, we set the auto width, enable edit and then add a global search to the top.

1
2
3
4
5
$dg->set_caption(strtoupper("$schemaName.$tableName"));
$dg->enable_autowidth(true);
$dg->enable_edit();
$dg->set_scroll(true);
$dg->enable_global_search(true);

Finally, before we go, let’s add the following javascript event to make sure that the grid will only resize in its container and not in the browser window itself.

1
2
3
4
// set grid width to parent DIV
$dg->before_script_end .= 'setTimeout(function(){$(window).bind("resize", function() {
phpGrid_'
. $tableName .'.setGridWidth($(".right").width());
}).trigger("resize");}, 0)'
;

Summary

Congrats! You have just built a content management console for your database!

The source code of this tutorial is publicly available on Github.

The post Database Content Administration Application in 15 Lines of PHP Code appeared first on phpGrid.

Drag & Drop Rows Between Grids

$
0
0

dnd-phpgrid

You can drag and drop rows between two or more grids using a mouse.

In the demo, we have both orders and employees datagrids on the same page.

1
2
3
$dg = new C_DataGrid("select * from employees", "employeeNumber", "employees");
$dg->enable_edit("FORM", "CRUD");
$dg->display();

We add the following Javascript to enable drag and drop between the two grids.

The Ondrop event posts the row data to another url “save_dropped_row.php”. You must implement this server side script to handle how you would like the row data to be saved.

1
2
3
4
5
6
7
8
9
10
11
12
13
14
15
16
17
18
19
20
21
22
23
<script>
$(function(){
  jQuery("#orders").jqGrid("sortableRows", {});
  jQuery("#employees").jqGrid("sortableRows", {});

  jQuery("#orders").jqGrid('gridDnD',{
    connectWith:'#employees',
    drop_opts:{
      hoverClass: "ui-state-active",
    },
    ondrop: function(evt, obj, data){
      $.ajax({
          method: "POST",
          url: "save_dropped_row.php",
          data: data,
        }).done(function( msg ) {
            console.log( "Data Saved: " + msg );
        })
    },

  });  
})
</script>

Complete Drag and drog API documentation can be found on jQuery UI draggable and droppable widgets.

Run Live Demo!

The post Drag & Drop Rows Between Grids appeared first on phpGrid.

Show Remaining Characters in Textarea/Input

$
0
0
input char counter

In a recent user support request, the user would like to see the remaining characters allowed for data input in a text input. This is not a phpGrid standard feature. How can it be achieved?

Custom event comes to rescue!

First of all, we must insert a new html node for our counter right after the text input. In our demo, we use the “status” field. The new counter will display the text of remaining allowed characters for data entry.

1
<span id='counter'></span>

We bind a new “onkeyup” JavaScript event to the “status” text input. The phpGrid event you should use is “jqGridAddEditAfterShowForm” so that the counter is only displayed AFTER the form is shown.

1
2
3
4
5
6
7
8
$afterShowForm = <<<AFTERSHOWFORM
function ()
{
    $("#tr_status > td.CaptionTD + td.DataTD").append("<span id='counter'></span>");   
    $("#status").attr("onkeyup","updateCounter()");
}
AFTERSHOWFORM
;
$dg->add_event('jqGridAddEditAfterShowForm', $afterShowForm);

We use the CSS selector to style our counter. Most importantly, we make sure it is displayed in the right place (at the end of the text input box).

1
2
3
4
5
6
7
8
9
/* move the counter atop */
#counter{
    font-size: 8px;
    position: relative;
    top: -15px;
    float: right;
    padding-right: 25px;
    display:inline-block;
}

Lastly, insert the javascript function below that updates our counter during each key press.

1
2
3
4
5
6
7
8
// show how much characters in "status" field input. Max is 10
function updateCounter() {
  var maxChar = 10;
  var pCount = 0;
  var pVal = $("#tr_status > td.CaptionTD + td.DataTD  input").val();
  pCount = pVal.length;
  $("#counter").text(pCount + '/' + maxChar);
}

Run Live Demo! (Click “Status” input box, and start typing)

The post Show Remaining Characters in Textarea/Input appeared first on phpGrid.

phpGrid, Laravel and Bootstrap (version 2)

$
0
0
phpgrid laravel5 bootstrap3 full editRun Demo

Introduction

This tutorial will begin by walking you through the integration of the Laravel 5 and Bootstrap 3 themes. Afterwards, we will show you how to add a PHP datagrid. If the Laravel and the Bootstrap theme are already up and running on your server, you can skip directly to “Create ‘dashboard.blade.php’ Child Template View” or “Where is phpGrid?”.

Install Laravel 5 (with Composer)

Let’s get started. Laravel 5 has the following system requirements.

  • PHP >= 5.4
  • Mcrypt PHP Extension
  • OpenSSL PHP Extension
  • Mbstring PHP Extension
  • Tokenizer PHP Extension

Please note that these Laravel 5 system requirements apply to both the web and the command line interface. There’s always a possibility that the version of PHP used in the command line may be different from the PHP running on the web server. If this is the case, modify your PHP alias to point to the same PHP executable for both. Finally, download a copy of phpGrid from download page for later use.

It is highly recommended that you use Composer to install Laravel. In order to keep the code lightweight, Laravel does not come prepackaged with any third-party libraries. Instead, it relies on Composer to manage any dependencies. Learn more about how to install Composer here.

To install Laravel, in the command line, go to the web root (e.g. /www), and execute the following command:

1
#composer create-project laravel/laravel --prefer-dist

To run Laravel, certain permissions need to be configured. Allow the web server to have write access to subfolders under the “storage” and “vendor” folders.

laravel5-folder-permission

Laravel, AdminLTE Integration

In a previous phpGrid Bootstrap integration tutorial, we used the “Bootstrap SmartAdmin” theme. Here,  we will use another theme called “AdminLTE“. You can preview it at https://almsaeedstudio.com/AdminLTE. If you are looking for alternative theme, we recommend the premium high qualify bootstrap themes from WrapBoottrap. While they are not free, it well worths the investment for developing beautiful and professional looking web apps.

Technically, AdminLTE works without the Laravel framework. But, by integrating it with Laravel, you get the added benefit of MVC routing and views. This ultimately results in cleaner, and more importantly, scalable code. The downside is that one must edit each AdminLTE page to covert it to Laravel views, preferably by using the Blade template.


Convert AdminLTE “starter.html” to Laravel View


At this point, we need to convert AdminLTE’s default “starter.html” to Laravel views so we can host our PHP datagrid. This consists of splitting the file into several “include” files – which will then be called by the startup routine.

  1. First, download AdminTLE from almsaeedstudio.com and extract the files. Copy the folders “bootstrap”, “dist”, “plugins”, and file “starter.html” to the Laravel “public” folder. Open “starter.html” and copy its contents to the clipboard. This will be used as our starting point to create the new Laravel view.

    laravel5-adminlte-integration

  2. Create a new view called “admin.blade.php”. (Note that all Blade templates should use the “.blade.php” extension.) Paste the text we copied from “starter.html” in the previous step and save the new view in “resources/views”. This will be the admin default layout from which the various Blade templates will be derived.convert-admin-views
  3. We now need to divide the code in “admin.blade.php” and copy it to a series of reusable sub-views. Create a new folder called “includes” under “resource/views”. This folder will be used to store these admin sub-views.phpgrid-laravel5-bootstrap3-includes-subviews
  4. Cut out the “<header>”” section and paste it as a new view which we will call “header.blade.php”. Change any hyperlinks or file references to use the Laravel “asset” help function. Save the new file in the “includes” folder.
    1
    2
    3
    4
    5
    6
    7
    8
    9
    10
    11
    12
    13
    14
    15
    16
    17
    18
    19
    20
    21
    22
    23
    24
    25
    26
    27
    28
    29
    30
    31
    32
    33
    34
    35
    36
    37
    38
    39
    40
    41
    42
    43
    44
    45
    46
    47
    48
    49
    50
    51
    52
    53
    54
    55
    56
    57
    58
    59
    60
    61
    62
    63
    64
    65
    66
    67
    68
    69
    70
    71
    72
    73
    74
    75
    76
    77
    78
    79
    80
    81
    82
    83
    84
    85
    86
    87
    88
    89
    90
    91
    92
    93
    94
    95
    96
    97
    98
    99
    100
    101
    102
    103
    104
    105
    106
    107
    108
    109
    110
    111
    112
    113
    114
    115
    116
    117
    118
    119
    120
    121
    122
    123
    124
    125
    126
    127
    128
    129
    130
    131
    132
    133
    134
    135
    136
    137
    138
    139
    <!-- Main Header -->
    <header class="main-header"><!-- Logo -->
    <a class="logo" href="index2.html">
    <!-- mini logo for sidebar mini 50x50 pixels -->
    <span class="logo-mini"><b>A</b>LT</span>
    <!-- logo for regular state and mobile devices -->
    <span class="logo-lg"><b>Admin</b>LTE</span>
    </a><!-- Header Navbar --><nav class="navbar navbar-static-top"><!-- Sidebar toggle button-->
    <a class="sidebar-toggle" href="#" data-toggle="offcanvas">
    <span class="sr-only">Toggle navigation</span>
    </a>
    <!-- Navbar Right Menu -->
    <div class="navbar-custom-menu">
    <ul class="nav navbar-nav">
    <ul class="nav navbar-nav"><!-- Messages: style can be found in dropdown.less-->
        <li class="dropdown messages-menu"><!-- Menu toggle button -->
    <a class="dropdown-toggle" href="#" data-toggle="dropdown">
    <i class="fa fa-envelope-o"></i>
    <span class="label label-success">4</span>
    </a>
    <ul class="dropdown-menu">
        <li class="header">You have 4 messages</li>
        <li><!-- inner menu: contains the messages -->
    <ul class="menu">
    <ul class="menu">
        <li><!-- start message -->
    <div class="pull-left"><!-- User Image -->
    <img class="img-circle" src="{{ asset('dist/img/user2-160x160.jpg') }}" alt="User Image" /></div>
    <!-- Message title and timestamp -->
    <h4>Support Team
    <small><i class="fa fa-clock-o"></i> 5 mins</small></h4>
    <!-- The message -->

    Why not buy a new awesome theme?</li>
    </ul>
    </ul>
    <!-- end message -->

    <!-- /.menu --></li>
        <li class="footer"><a href="#">See All Messages</a></li>
    </ul>
    </li>
    </ul>
    </ul>
    <!-- /.messages-menu -->

    <!-- Notifications Menu -->
    <ul class="nav navbar-nav">
    <ul class="nav navbar-nav">
        <li class="dropdown notifications-menu"><!-- Menu toggle button -->
    <a class="dropdown-toggle" href="#" data-toggle="dropdown">
    <i class="fa fa-bell-o"></i>
    <span class="label label-warning">10</span>
    </a>
    <ul class="dropdown-menu">
        <li class="header">You have 10 notifications</li>
        <li><!-- Inner Menu: contains the notifications -->
    <ul class="menu">
    <ul class="menu">
        <li><!-- start notification -->
    <a href="#">
    <i class="fa fa-users text-aqua"></i> 5 new members joined today
    </a></li>
    </ul>
    </ul>
    <!-- end notification --></li>
        <li class="footer"><a href="#">View all</a></li>
    </ul>
    </li>
    </ul>
    </ul>
    <!-- Tasks Menu -->
    <ul class="nav navbar-nav">
    <ul class="nav navbar-nav">
        <li class="dropdown tasks-menu"><!-- Menu Toggle Button -->
    <a class="dropdown-toggle" href="#" data-toggle="dropdown">
    <i class="fa fa-flag-o"></i>
    <span class="label label-danger">9</span>
    </a>
    <ul class="dropdown-menu">
        <li class="header">You have 9 tasks</li>
        <li><!-- Inner menu: contains the tasks -->
    <ul class="menu">
    <ul class="menu">
        <li><!-- Task item -->
    <a href="#">
    <!-- Task title and progress text --></a>
    <h3>Design some buttons
    <small class="pull-right">20%</small></h3>
    <!-- The progress bar -->
    <div class="progress xs"><!-- Change the css width attribute to simulate progress -->
    <div class="progress-bar progress-bar-aqua" style="width: 20%;"><span class="sr-only">20% Complete</span></div>
    </div></li>
    </ul>
    </ul>
    <!-- end task item --></li>
        <li class="footer"><a href="#">View all tasks</a></li>
    </ul>
    </li>
    </ul>
    </ul>
    <!-- User Account Menu -->
    <ul class="nav navbar-nav">
    <ul class="nav navbar-nav">
        <li class="dropdown user user-menu"><!-- Menu Toggle Button -->
    <a class="dropdown-toggle" href="#" data-toggle="dropdown">
    <!-- The user image in the navbar-->
    <img class="user-image" src="{{ asset('dist/img/user2-160x160.jpg') }}" alt="User Image" />
    <!-- hidden-xs hides the username on small devices so only the image appears. -->
    <span class="hidden-xs">Alexander Pierce</span>
    </a>
    <ul class="dropdown-menu">
    <ul class="dropdown-menu"><!-- The user image in the menu -->
        <li class="user-header"><img class="img-circle" src="{{ asset('dist/img/user2-160x160.jpg') }}" alt="User Image" />Alexander Pierce - Web Developer
    <small>Member since Nov. 2012</small></li>
    </ul>
    </ul>
    <!-- Menu Body -->
    <ul class="dropdown-menu">
    <ul class="dropdown-menu">
        <li class="user-body">
    <div class="col-xs-4 text-center"><a href="#">Followers</a></div>
    <div class="col-xs-4 text-center"><a href="#">Sales</a></div>
    <div class="col-xs-4 text-center"><a href="#">Friends</a></div></li>
    </ul>
    </ul>
    <!-- Menu Footer-->
    <ul class="dropdown-menu">
        <li class="user-footer">
    <div class="pull-left"><a class="btn btn-default btn-flat" href="#">Profile</a></div>
    <div class="pull-right"><a class="btn btn-default btn-flat" href="#">Sign out</a></div></li>
    </ul>
    </li>
    </ul>
    </ul>
    <!-- Control Sidebar Toggle Button -->

    </div>
    </nav></header>
  5. Now, go back to “admin.blade.php” and cut out the “<aside>”” sidebar section and paste it as a new view called “sidebar.blade.php”. As in the previous step, change any hyperlinks or file references so they use the Laravel “asset” help function. Save this file in the “includes” folder.
    1
    2
    3
    4
    5
    6
    7
    8
    9
    10
    11
    12
    13
    14
    15
    16
    17
    18
    19
    20
    21
    22
    23
    24
    25
    26
    27
    28
    29
    30
    31
    32
    33
    34
    35
    36
    37
    38
    39
    40
    41
    42
    43
    <!-- Left side column. contains the logo and sidebar --><aside class="main-sidebar"><!-- sidebar: style can be found in sidebar.less --><section class="sidebar"><!-- Sidebar user panel (optional) -->
    <div class="user-panel">
    <div class="pull-left image"><img class="img-circle" src="{{ asset('dist/img/user2-160x160.jpg') }}" alt="User Image" /></div>
    <div class="pull-left info">

    Alexander Pierce

    <!-- Status -->
    <a href="#"><i class="fa fa-circle text-success"></i> Online</a>

    </div>
    </div>
    <!-- search form (Optional) -->

    <form class="sidebar-form" action="#" method="get">
    <div class="input-group"><input class="form-control" name="q" type="text" placeholder="Search..." />
    <span class="input-group-btn">
    <button id="search-btn" class="btn btn-flat" name="search" type="submit"><i class="fa fa-search"></i></button>
    </span></div>
    </form><!-- /.search form -->

    <!-- Sidebar Menu -->
    <ul class="sidebar-menu">
    <ul class="sidebar-menu">
        <li class="header">HEADER</li>
    </ul>
    </ul>
    <!-- Optionally, you can add icons to the links -->
    <ul class="sidebar-menu">
        <li class="active"><a href="#"><i class="fa fa-link"></i> Link</a></li>
        <li><a href="#"><i class="fa fa-link"></i> Another Link</a></li>
        <li class="treeview"><a href="#"><i class="fa fa-link"></i> Multilevel <i class="fa fa-angle-left pull-right"></i></a>
    <ul class="treeview-menu">
        <li><a href="#">Link in level 2</a></li>
        <li><a href="#">Link in level 2</a></li>
    </ul>
    </li>
    </ul>
    <!-- /.sidebar-menu -->

    </section><!-- /.sidebar -->

    </aside>
  6. Repeat these steps for the “<footer>”” and “<control>”” sidebar sections. Name the files “footer.blade.php” and “controlsidebar.blade.php” and “footer.blade.php”
    1
    2
    3
    4
    5
    6
    7
    8
    <!-- Main Footer -->

    <footer class="main-footer"><!-- To the right -->
    <div class="pull-right hidden-xs">Anything you want</div>
    <!-- Default to the left -->
    <strong>Copyright © 2015 <a href="#">Company</a>.</strong> All rights reserved.

    </footer>

    controlsidebar.blade.php

    1
    2
    3
    4
    5
    6
    7
    8
    9
    10
    11
    12
    13
    14
    15
    16
    17
    18
    19
    20
    21
    22
    23
    24
    25
    26
    27
    28
    29
    30
    31
    32
    33
    34
    35
    36
    37
    38
    39
    40
    41
    42
    43
    44
    45
    46
    <!-- Control Sidebar -->

    <aside class="control-sidebar control-sidebar-dark"><!-- Create the tabs --><!-- Tab panes -->
    <div class="tab-content"><!-- Home tab content -->
    <div id="control-sidebar-home-tab" class="tab-pane active">
    <h3 class="control-sidebar-heading">Recent Activity</h3>
    <ul class="control-sidebar-menu">
        <li><a>
    <i class="menu-icon fa fa-birthday-cake bg-red"></i></a>
    <div class="menu-info">
    <h4 class="control-sidebar-subheading">Langdon's Birthday</h4>
    Will be 23 on April 24th

    </div></li>
    </ul>
    <!-- /.control-sidebar-menu -->
    <h3 class="control-sidebar-heading">Tasks Progress</h3>
    <ul class="control-sidebar-menu">
        <li>
    <h4 class="control-sidebar-subheading">Custom Template Design
    <span class="label label-danger pull-right">70%</span></h4>
    </li>
    </ul>
    <!-- /.control-sidebar-menu -->

    </div>
    <!-- /.tab-pane -->
    <!-- Stats tab content -->
    <div id="control-sidebar-stats-tab" class="tab-pane">Stats Tab Content</div>
    <!-- /.tab-pane -->
    <!-- Settings tab content -->
    <div id="control-sidebar-settings-tab" class="tab-pane"><form method="post">
    <h3 class="control-sidebar-heading">General Settings</h3>
    <div class="form-group"><label class="control-sidebar-subheading">
    Report panel usage
    <input class="pull-right" checked="checked" type="checkbox" />
    </label>Some information about this general settings option</div>
    <!-- /.form-group -->

    </form></div>
    <!-- /.tab-pane -->

    </div>
    </aside><!-- Add the sidebar'
    s background. This div must be placed
    immediately after the control sidebar -->
    <div class="control-sidebar-bg"></div>
  7. Add the “include” statements for the newly-created sub-views in “admin.blade.php”, as shown below
    1
    2
    3
    4
    @include('includes.header');
    @include('includes.sidebar');
    @include('includes.footer');
    @include('includes.controlsidebar');
  8. Also in “admin.blade.php”, add the following section between sidebar and footer. Copy and past section <div class=”content-wrapper”>(see below) where we host the code in which phpGrid is rendered. Also include “@yield(‘content’)”” in <section class=”content”> section.
    1
    2
    3
    4
    5
    6
    7
    8
    9
    10
    11
    12
    13
    14
    15
    16
    17
    18
    19
    20
    21
    22
    23
    24
    25
    26
    27
    <div class="wrapper">

    @include('includes.header')
    @include('includes.sidebar')

    <!-- Content Wrapper. Contains page content -->
    <div class="content-wrapper"><!-- Content Header (Page header) -->
    <section class="content-header">
    <h1>Page Header
    <small>Optional description</small></h1>
    <ol class="breadcrumb">
        <li><a href="#"><i class="fa fa-dashboard"></i> Level</a></li>
        <li class="active">Here</li>
    </ol>
    </section><!-- Main content -->

    <section class="content"><!-- Your Page Content Here -->
    @yield('content')</section><!-- /.content -->

    </div>
    <!-- /.content-wrapper -->

    @include('includes.footer')
    @include('includes.controlsidebar')

    </div>
    <!-- ./wrapper -->
  9. Move the required Javascript found at the bottom of “starter.html” to the “<head>”” section (not “<header>”!) in “admin.blade.php”.
    1
    2
    3
    4
    5
    6
    7
    8
    9
    10
    11
    <!– REQUIRED JS SCRIPTS --!>
    <!– jQuery 2.1.4 –->
    <script src="”{{"></script>
     <!– Bootstrap 3.3.2 JS –>
    <script src="”{{" type="”text/javascript”"></script>
    <!– AdminLTE App –>
    <script src="”{{" type="”text/javascript”"></script>
    <!– Optionally, you can add Slimscroll and FastClick plugins.
    Both of these plugins are recommended to enhance the
    user experience. Slimscroll is required when using the
    fixed layout. –>
  10. We are almost done. In “admin.blade.php”, be sure to change any hyperlinks or file references, so they point to the Laravel “asset” help function.


Create “dashboard.blade.php” Child Template View


We just created our admin layout by dividing the file “starter.html” into various views and sub-views and saving them as PHP files. “admin.blade.php” is our parent layout – the one that is used as a basis for all other admin layouts and the file from which these other layouts will extend. Variable “$grid” holds the PHP datagrid object passed from route next.

1
2
3
4
5
@extends('admin')

@section('content')
{!! $grid !!}
@endsection


Where Is phpGrid??


Up until now, the walk-through has addressed converting AdminLTE theme to Laravel views. Everything in Laravel 5 is autoloaded using PSR-4 within the “app/” directory. This can be seen in the “composer.json” file.

Although we foresee the capability in future releases, for backward compatibility reasons, phpGrid currently does not support the namespace construct. Without namespace support, we cannot call our C_DataGrid class from directly within the Laravel Controller. – The workaround is to call phpGrid directly from a route file. For this reason, instead of storing phpGrid in the app/ directory, we place the phpGrid components in the public folder.

The correct path to put phpGrid is in the Laravel “public” folder, not “app” folder.
X

So, go ahead and download a copy of phpGrid if you haven’t already done so, and extract the files into the Laravel “public” folder. Complete the installation by configuring the “conf.php” file. For instructions on how to do this, see setup phpGrid configuration.

Once you have completed the previous step, in the Laravel route file “app/Http/routes.php”, copy and paste the following code snippet:

1
2
3
4
5
6
7
8
9
10
11
12
Route::get(‘dashboard’, function () {
require_once(public_path() ./phpGrid_Lite/conf.php”);

$dg = new C_DataGrid(“SELECT * FROM orders”, “orderNumber”, “orders”);
$dg->enable_edit(“INLINE”, “CRUD”);
$dg->enable_autowidth(true)->enable_autoheight(true);
$dg->set_theme(‘cobalt-flat’);
$dg->display(false);

$grid = $dg -> get_display(true); // do not include required javascript libraries until later with with display_script_includeonce method.
return view(‘dashboard’, [‘grid’ => $grid]);
});

That’s all there is to it. You can now run the dashboard demo.

Run Demo


Where is the controller?


Where is the Laravel controller?You may ask, “Where is the Laravel controller for our view?” The answer is it is simply not needed for our datagrid. The route we created in a previous step essentially controls the view for us. In a perfect world, the controller would be stored where all logic and pass information for rendering views would be handled. However, phpGrid’s current lack of “namespace” support makes it impossible for us to call the phpGrid library from within the Laravel Controller. In a future phpGrid release which offers “namespace” support, this workaround will no longer be necessary.


phpgrid-laravel5-bootstrap3-full-edit


Reference:

The post phpGrid, Laravel and Bootstrap (version 2) appeared first on phpGrid - PHP Datagrid.

Transform HTML Table into Card View Using Nothing But CSS

$
0
0
table2card

I’d like share a recent experiment that explores how to transform a plain, old-fashioned HTML table into a dynamic card view, going beyond the traditional rows and columns.

Start With a Simple HTML Table

Let’s begin with a simple HTML table such as the following.

1
2
3
4
5
6
7
8
9
10
11
12
13
14
15
16
17
18
19
20
21
22
23
24
25
26
27
28
29
30
31
32
33
34
35
36
37
38
39
40
41
42
43
44
45
46
47
48
49
50
51
<table>
  <thead>
    <tr>
      <th>Company</th>
      <th>Contact</th>
      <th>Country</th>
    </tr>
  </thead>
  <tbody>
  <tr>
    <td>Alfreds Futterkiste</td>
    <td>Maria Anders</td>
    <td>Germany</td>
  </tr>
  <tr>
    <td>Centro Moctezuma</td>
    <td>Francisco Chang</td>
    <td>Mexico</td>
  </tr>  
  <tr>
    <td>Alfreds </td>
    <td>Maria </td>
    <td>Germany</td>
  </tr>
  <tr>
    <td>Centro  </td>
    <td>Francisco Chang</td>
    <td>Mexico</td>
  </tr>
  <tr>
    <td>Alfreds </td>
    <td>Maria </td>
    <td>Germany</td>
  </tr>
  <tr>
    <td>Centro comercial </td>
    <td>Francisco </td>
    <td>Mexico</td>
  </tr>
  <tr>
    <td>Alfreds </td>
    <td>Maria Anders</td>
    <td>Germany</td>
  </tr>
  <tr>
    <td>Centro comercial </td>
    <td>Francisco </td>
    <td>Mexico</td>
  </tr>
  </tbody>
</table>

It looks like this when rendered in browser.

plain table

Just another html table with rows and columns. Nothing fancy.

So how can we transform the traditional rows and columns layout into something more dynamic?

Discover the Power of CSS Grid

Tables don’t have to be boring. With a few simple CSS tricks, you can easily transform a traditional HTML table into a sleek list or card view.

The best part? No JavaScript, just pure CSS!

CSS grid has been an W3C Candidate Recommendation Draft since 2007, however, it has been adopted by the recent versions of all current major browsers.

CSS grid is designed for both rows and columns, making it ideal for complex layouts such as table. It allows you to manage both horizontal and vertical alignments simultaneously, which gives you much more control than Flexbox, which is primarily one-dimensional (row or column).

CSS Grid Properties to Use

  1. Use CSS grid layout for <thead> and <tbody>.
  2. Use CSS display property and set all <td> to be block elements
1
2
3
4
5
6
table tbody, table thead {
  display: grid;
}
table td {
  display: block;
}

With the CSS above, our plain HTML table already magically transforms into a responsive list view, displaying each record neatly in a single column.

table single column

It’s looking good but a bit chaotic! Let’s sprinkle on some CSS borders to give each row in our list a little breathing room.

1
2
3
table, th, tr {
  border: 1px solid black;
}

There you go. Not too shabby for a list view created without a single line of JavaScript!

table singl column with border

Now we got a nice list made from an old-fashioned html table, how do we turn that nice list into a card view?

Spoiler alert: just sprinkle on a few more lines of CSS!

Transform List into Card View

Our final card trick to transform table into cards is to use CSS grid property grid-template-columns:

1
2
3
4
table tbody {
  display: grid;
  grid-template-columns: repeat(4, 1fr);
}

grid-template-columns is a CSS property used in the CSS Grid layout to define the structure of the grid’s columns. It specifies the number of columns, their widths, and how the space within the grid is divided.

With the repeat() function, the first parameter lets us decide how many columns we want—let’s say 4. The second parameter tells those columns how big to be—1fr, or one fraction of the available space. It’s like telling your columns to all get an equal slice of the space pie.

Our final card view

final card view

Take a moment to explore the code and see the results for yourself over on CodePen. It’s the perfect place to experiment and play around with CSS grid transformations.

Keep in mind that CSS Grid is also responsive, providing developers with enhanced control over how layouts adjust and reflow across various screen sizes and devices.

Optional: Adding data-label to card view

While the card view is visually appealing, it lacks the clarity of column information, leaving users to guess the data represented in each card.

By incorporating a touch of JavaScript, we can seamlessly add data labels for each column, enhancing the association between the labels and their corresponding cells.

1
2
3
4
5
6
7
8
9
10
11
12
// Store each column header to array
var labels = [];
$('table').find('thead th').each(function() {
    labels.push($(this).text());
});

// Add data-label attribute to each cell
$('table).find('tbody tr').each(function() {
    $(this).find('
td').each(function(column) {
        $(this).attr('
data-label', labels[column]);
    });
});

It now looks like this

card view enhanced

Demo

It’s nothing like the html table that we started with. With CSS Grid, the layout options are endless because it allows for full control over both rows and columns in a two-dimensional space.

Final thought…

This tutorial only scratches the surface of the iceberg. You can easily create more responsive layouts, overlap elements, span items across multiple rows or columns, and adjust grid areas dynamically, making it highly versatile for various layout needs.

Happy gridding!

Richard

The post Transform HTML Table into Card View Using Nothing But CSS appeared first on phpGrid - PHP Datagrid.


Viewing all 15 articles
Browse latest View live